Best Way To Tile Around A Bath / Tips From the Pros on Painting Bathtubs and Tile | Painting Ideas, How to Paint a Room or ... - You can use a plastic tile bath trim which is self adhesive,l shaped with a rubber edge.
Best Way To Tile Around A Bath / Tips From the Pros on Painting Bathtubs and Tile | Painting Ideas, How to Paint a Room or ... - You can use a plastic tile bath trim which is self adhesive,l shaped with a rubber edge.. Every window or door has its own challenge, and the best way of waterproofing the assembly may be a challenge. Heather from the heathered nest here at remodelaholic again today, and i want to show you all you remodelaholics how you can do this project, too. When tiling a bathroom, mark out your desired grid pattern on the floor, and lay tile over the unobstructed areas first. When you tile around it get some of that bath and tile surround from the diy mercants. This video will show you how to set tile around a tub.
Plan to extend the tile 2 or 3 in. The process, which takes four steps, begins by first measuring the space to be tiled. Fix bath into position connecting plumbing and waste, fill up bath with water, check if bath is level again, seal around bath to walls with a good quality silicone, tile on top of bath and seal again after grouting. Lee wallender when tiling bathtubs, backsplashes, and other areas that use limited quantities of tile, buy the best quality tile you can afford. Tiling around a bathtub introduces additional challenges.
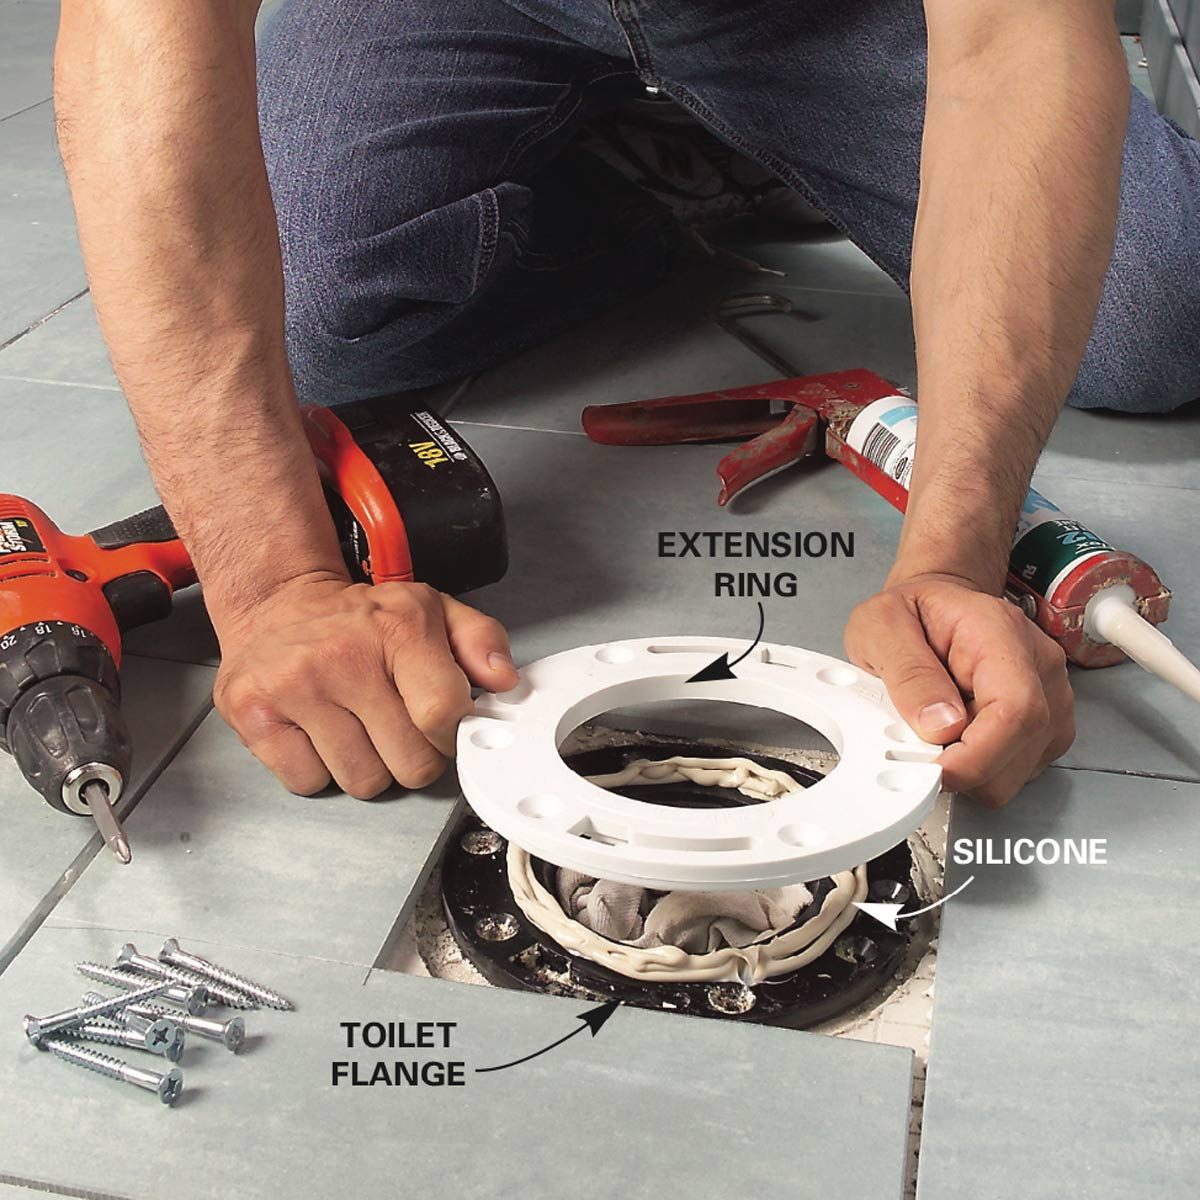
Tiling around fiberglass shower enclosure | Fiberglass shower door, Fiberglass shower ... from i.pinimg.com This video will show you how to set tile around a tub. Every window or door has its own challenge, and the best way of waterproofing the assembly may be a challenge. Don't tile around the toilet flange—the circular piece that connects to the drain pipe and upon which the toilet itself will rest—until the end. If you will need a small slip of tile then you may prefer to have a part tile near the bath lip or at the top of your tiled area. This will stop the silicone from splitting in the future; Tile against a curved shape, it's best to use a piece of thin card and draw a template of the exact size of the tile. This way you can prevent water from getting behind the tile and into the window framing. The best approach when installing cement board or other tile backer around a tub is to keep the cement board out of the lip area.
Then, in a vertical motion, use the notched edge of the trowel to create tidy rows of ridges in the adhesive.
Divide the dimension in half and make a mark there. Answered 8th dec 2011 liked 16 This will stop the silicone from splitting in the future; Every window or door has its own challenge, and the best way of waterproofing the assembly may be a challenge. Make sure your shower or bath's waterproofing system is designed with the windows in mind. This sits on top of your tiles and overlaps your gap. The classic design feature is usually between 34 and 54 high, with 36 being the average height. First, use the smooth surface of the trowel to evenly distribute the adhesive. Add a healthy dollop of the mixture to your trowel and whack it onto a small area you wish to tile. Tile against a curved shape, it's best to use a piece of thin card and draw a template of the exact size of the tile. A total of 6 x 6″ tiles and drywall was removed around the vale and another tile in the centre just above the spout was removed. This surround contains a recessed alcove backed with mosaic tile, used to hold soaps and other bath materials. Using a tile backer board is a great way to create a sturdy, dry surface that you can then tile onto.
For a shower enclosure, extend the tile and the backerboard at least 6 inches above the showerhead. Firstly put bath in position, level it, make recesses into wall or walls (as its unlikely to find perfect 90 degree walls). This video will show you how to set tile around a tub. Beyond the tub and to leave at least a half tile along the wall if possible. Cut small, evenly spaced slits along one edge of the tile and press them against a curve
Bathroom Tile Ideas - Tile Flooring, Backsplash & Shower Designs from www.westsidetile.com There are no seams of drywall as the wall was cut along the grout lines. Then, in a vertical motion, use the notched edge of the trowel to create tidy rows of ridges in the adhesive. When tiling a bathroom, mark out your desired grid pattern on the floor, and lay tile over the unobstructed areas first. The classic design feature is usually between 34 and 54 high, with 36 being the average height. Installing tile around bathroom sinks is one way of adding an attractive value to a home while adding a personal touch. If the tub is level, set a full tile at its top edge. Tile layout around doors and windows is critical. Make sure your shower or bath's waterproofing system is designed with the windows in mind.
A total of 6 x 6″ tiles and drywall was removed around the vale and another tile in the centre just above the spout was removed.
Fix bath into position connecting plumbing and waste, fill up bath with water, check if bath is level again, seal around bath to walls with a good quality silicone, tile on top of bath and seal again after grouting. Adjust the vertical layout accordingly. Wainscotting is a classic choice for bathrooms that border on the traditional side. Fit the bath then tile around it. Ideally, tile is meant to last a lifetime when installed properly, but accidents and natural disasters can cause damage requiring pieces to be replaced. A total of 6 x 6″ tiles and drywall was removed around the vale and another tile in the centre just above the spout was removed. This sits on top of your tiles and overlaps your gap. Once you are ready to lay the tile, start at the corner, with the chair rail border (image 2). Above the lip of the tub. Apply it to the wall with the bottom edge about 1/4 in. Cut small, evenly spaced slits along one edge of the tile and press them against a curve Tiling around a bathtub introduces additional challenges. Turn over the trowel to the notched side and comb over in one direction.
This sits on top of your tiles and overlaps your gap. Next, measure the width of the back wall, bisect the width and draw a vertical line down the wall behind the bath. Firstly put bath in position, level it, make recesses into wall or walls (as its unlikely to find perfect 90 degree walls). There are steel studs of 1.5″ width. To tile around a tub or shower, start by measuring the height of the back wall from the lip of the tub to the top of the area to be tiled.
How to Lay Tile: Install a Ceramic Tile Floor In the Bathroom from www.familyhandyman.com A total of 6 x 6″ tiles and drywall was removed around the vale and another tile in the centre just above the spout was removed. The classic design feature is usually between 34 and 54 high, with 36 being the average height. Then, in a vertical motion, use the notched edge of the trowel to create tidy rows of ridges in the adhesive. Adjust the vertical layout accordingly. First, use the smooth surface of the trowel to evenly distribute the adhesive. Part of it is permanent under the tile to help keep the surface level during installation (the trippiest part for me), and part goes on top to clip each tile level with the ones near it. Use a small amount of the excess mortar and spread it onto the back of a tile with the notched side of the trowel. Plan to extend the tile 2 or 3 in.
Painting the bathroom tile can involve either rolling color onto large swaths of tile at a time or brushing individual tiles by first cutting in around the edges.
Apply the silicone and leave overnight to cure, then empty the bath the next morning. Use the method shown in the mock up and measure photo above to determine how wide the corner tile needs to be in order to extend the tile beyond the tub. Bathroom tiles are a simple way to create character in a practical way. I cover some of the specifics of how to layout and set up a tub to install tile around it.i'm using th. Plan the tile layout so a column of tile extends past the end of the tub. Turn over the trowel to the notched side and comb over in one direction. This way you can prevent water from getting behind the tile and into the window framing. Tile layout around doors and windows is critical. Once you are ready to lay the tile, start at the corner, with the chair rail border (image 2). There are numerous benefits to using a tile backer board in your bathroom. When tiling a bathroom, mark out your desired grid pattern on the floor, and lay tile over the unobstructed areas first. Part of it is permanent under the tile to help keep the surface level during installation (the trippiest part for me), and part goes on top to clip each tile level with the ones near it. Run a damp sponge over the backer board in the area you intend to tile.